.

......
INTRODUCTION
Since 12 years I study Judaean coins, I have classified 11,000 specimens
die per die[1].
In the two first years, I was sometimes confused when I added new coins:
they were obviously struck by the same dies as coins I already listed,
but a little group of letters in their inscription was completely
different. They showed the same repartition of the dots in the border,
same minor defects and breaks in the background, but a few different
letters! Where they recut by ancient engravers, or were they tooled or
painted by a modern, unscrupulous hand to artificially increase the
value of the piece? I was not sure yet and I kept these enigmatic
specimens in a ‘uncertain’ folder. Another detail was striking: the
appearance of these ‘irregular’ letters was always poorer and cruder
than the regular ones.
Then, as I was constantly adding and analysing hundreds and hundreds of
new specimens, I progressively understood that in most cases, the
ancient engravers had no reason to recut a die that was already well cut
with a well balanced inscription and beautiful illustrations. It
definitely appeared to me that these crude letters were alien details
that had nothing to deal with ancient times. They were the fact of
tooling and/or painting, unacceptable practices used by crooks.
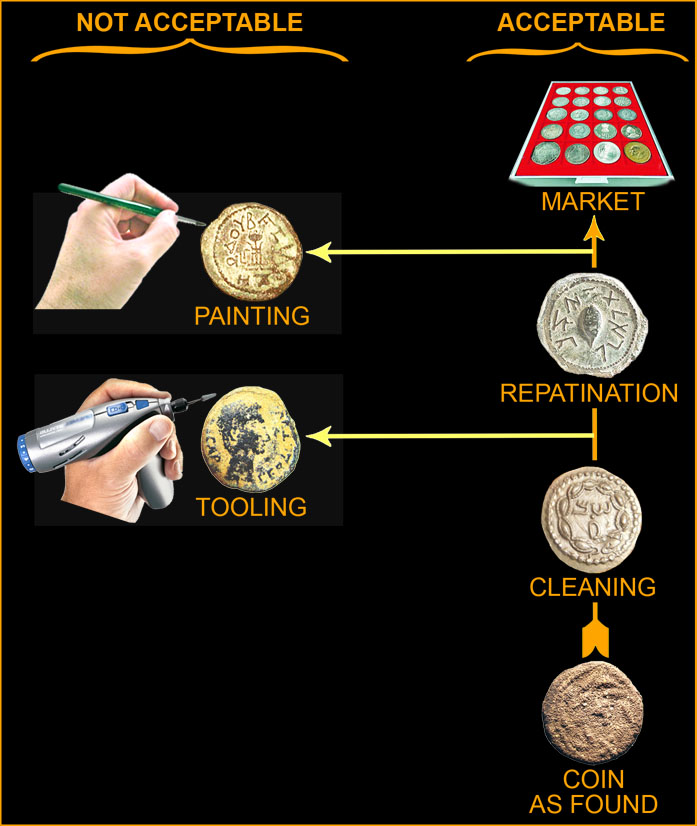
The following pictures show the different steps of coin restoration: The acceptable ones (cleaning, repatination) and the unacceptable ones (tooling, painting).
PLEASE KEEP IN MIND THAT
JUDAEAN COINS ARE NOT THE ONLY ONES TO BE AFFECTED BY TOOLING/PAINTING.
IF MOST OF THE EXAMPLES SHOWN IN THE PICTURES HEREAFTER ARE JUDAEAN, IT
IS SIMPLY BECAUSE THEY ARE MY FAVOURITE FIELD OF RESEARCH.
[1]
I have classified die-per-die ALL the coin types in the following
categories: Yehud,
Herod the Great,
Pontius Pilate
(varieties only), Antipas,
Agrippa I, and the
First
Jewish War. The result of this work is visible on this website
www.MenorahCoinProject.org
..
Fig. 1: Coin restoration: Acceptable and unacceptable processes
..
..
1. CLEANING
.
Fig. 2: Silver coins before and after cleaning
The ancient coins are found in various ways: sometimes heavily encrusted (Fig. 2 at right), sometimes more lightly (Fig. 2 at left). In any case, they need to be cleaned.
.
.
2. REPATINATION
.
Repatination is an improper word that does not consist in removing the original patina in order to replace it by a new and thus fake one. It simply consists, after a coin has been cleaned, in adding a layer of bright substance in the background in order to enhance the patterns. The silver coins do not need repatination because they are naturally bright, but the bronze coins, when cleaned, are generally covered by a dark patina and they need repatination.
...
Fig. 3: Repatination
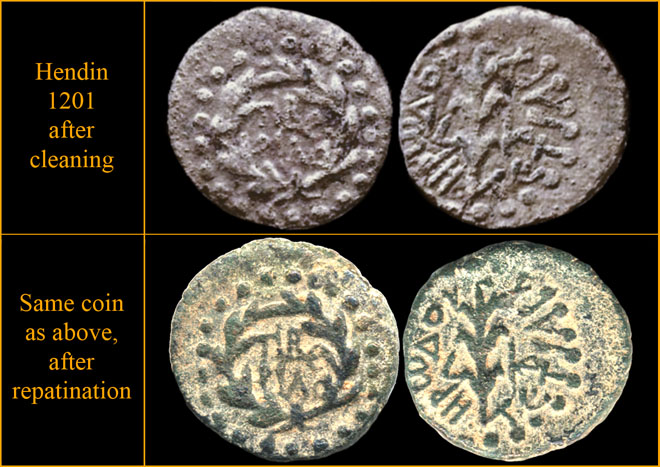
Fig. 3 shows a good example of what happens when a bronze coin is cleaned (at top): An uniformly spread out black patina covers all the coin and the details in the inscriptions and illustrations are hard to perceive. The best way to enhance them from the background is repatination (at bottom).
....
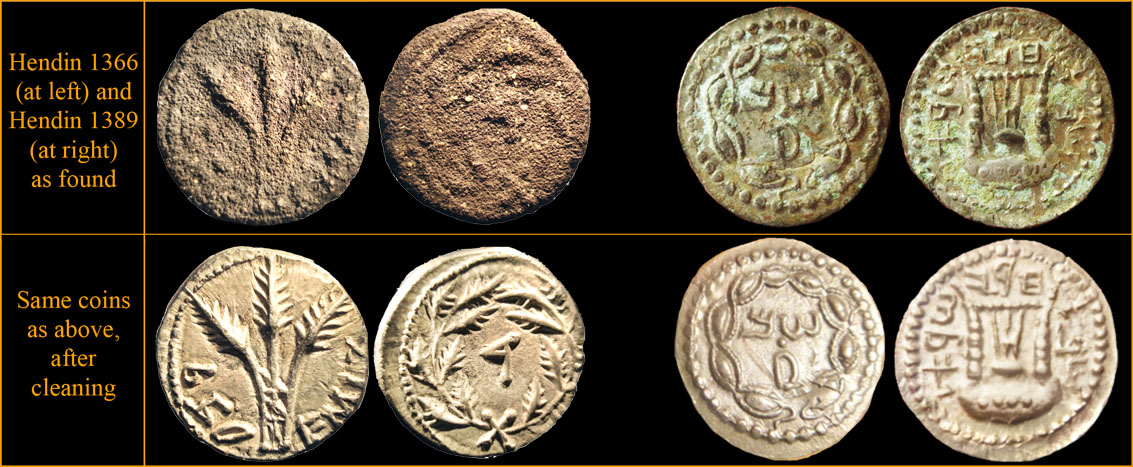
Fig. 4: Coins as found (at top), and then after cleaning and repatination (at bottom):
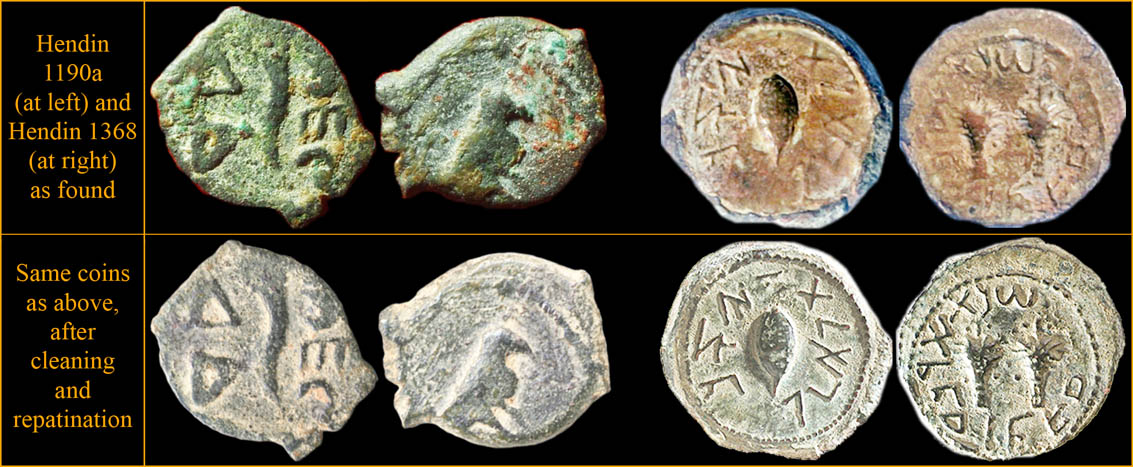
As shown on Fig. 4, there is no question that cleaned and repatinated coins are more desirable than coins as found
...
Fig. 5: Light repatination Vs. thick repatination
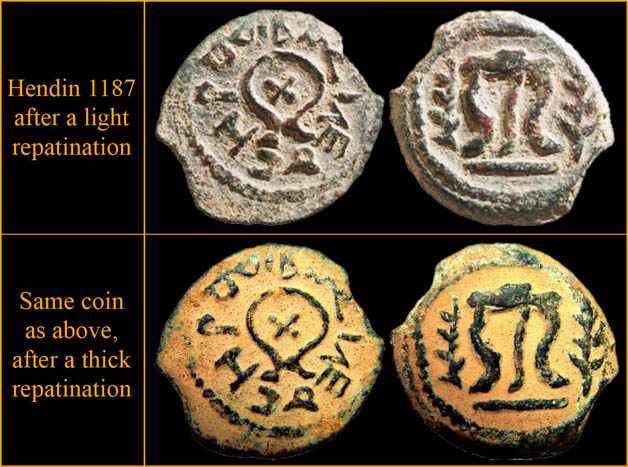
Light repatination (at top) is always preferable. A too thick repatination (at bottom), which is a kind of ‘controlled’ desert-like encrustations, can be used to mask a corroded background, scratches or traces of tooling (it is not the case here). We must keep in mind that the only purpose of repatination is to enhance the patterns, not to mask anything. The minute details in the background of a coin, like breaks, flaws or engraving mistakes/corrections, should remain visible after repatination.
..
..
3. PAINTING
.
Painting is an easy and fast technique often used to artificially improve a coin. Most commonly, a thin coat of paint simply may be applied to portions of the surface of the coin to smooth it and hide a rough or pitted condition. Painting also may be used to add letters or patterns that are missing or not well preserved enough on the original specimen. The situation about painted coins offered for sale on the market is simple: everybody 'forget' to mention it! Is it because the process is non destructive and reversible? Maybe yes. But like tooling, painting is an artificial proceed to improve a coin and to ask more to customers. So it would be more serious and honest to mention when a coin is painted.
.
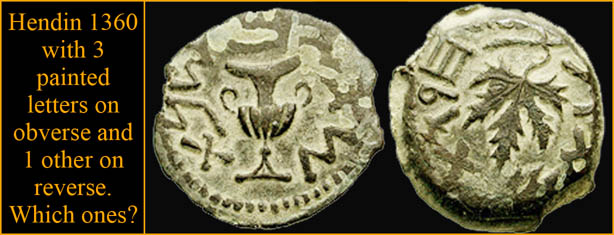
Fig. 6: Painting: Before and after
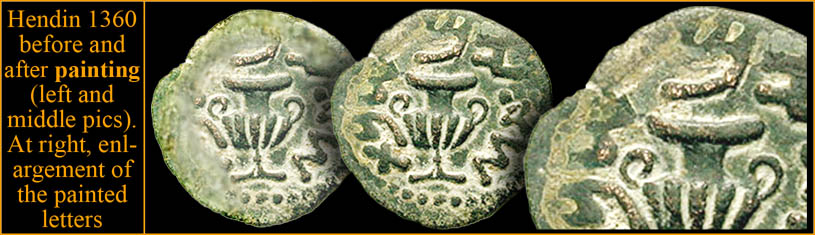
Unlike tooling, painting is a reversible and non-destructive process which is easy to detect: the painted patterns or letters have no or almost no relief.
.
Fig. 7: Other examples of painted coins
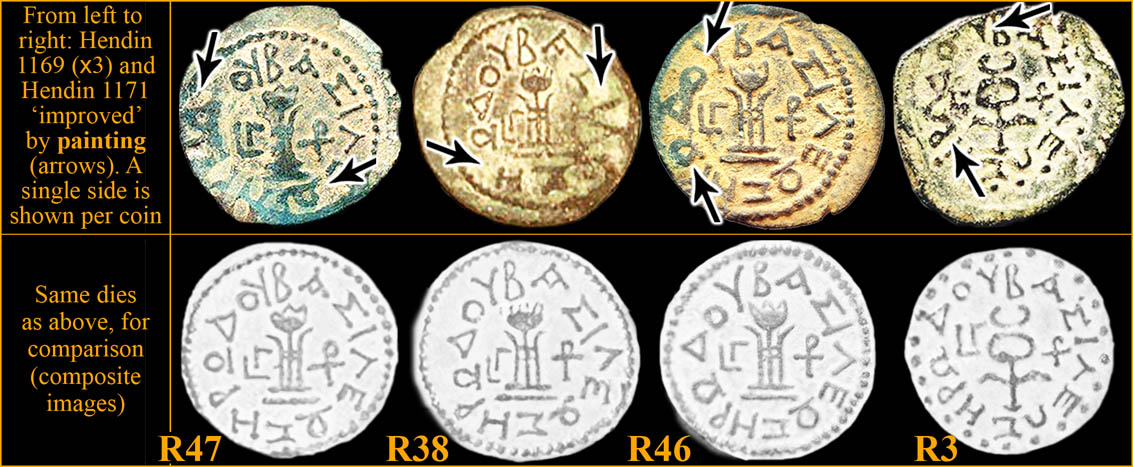
As shown on Fig. 7, in most cases, the letters or illustrations ‘improved’ by painting look like alien, incoherent elements and they are less beautiful than the original ones. On the two first coins, the result is simply ugly. On the two other ones, it is poorly done. On all of the 4 coins presented here, the letters added by painting are not credible an thus easy to detect.
..
Fig. 8: Now, its your turn!
.
.
4. TOOLING BY SMOOTHING
.
Tooling by smoothing is the practice of scraping away portions of a coin's surface to remove evidence of corrosion and pitting. The metal surface of the coin may be removed to below the depth of the corrosion or pits to make it appear that the formerly impaired coin is smooth. In other instances, smoothing may involve gluing or applying on the coin a resin or metallic material to cover or fill the pitted areas.
.
Fig. 9: Smoothed coins
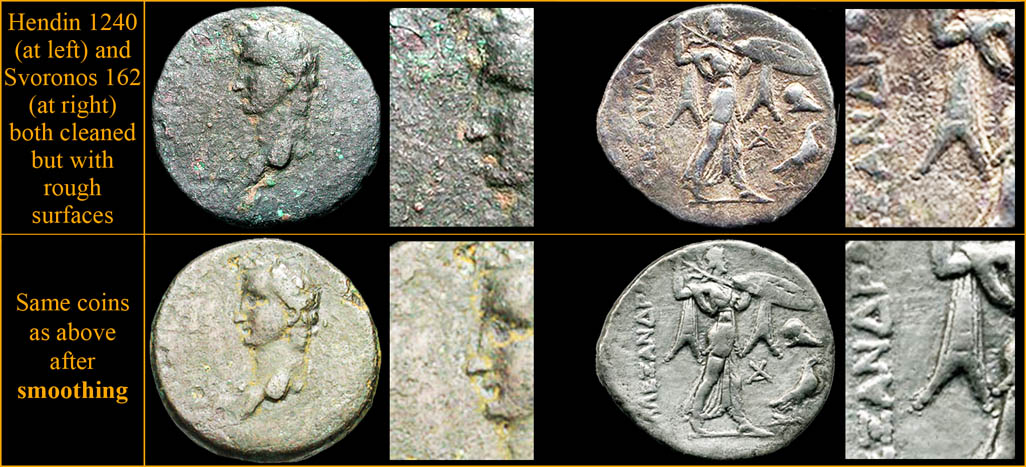
Even after cleaning, the surfaces of the two coins shown in Fig. 10 (a single side per coin is shown) remained affected by corrosion (no cleaning process can remove corrosion). They have been then artificially upgraded by smoothing. That this kind of smoothing be undisclosed in a coin description is definitely unacceptable.
.
Fig. 10: An acceptable case of smoothing
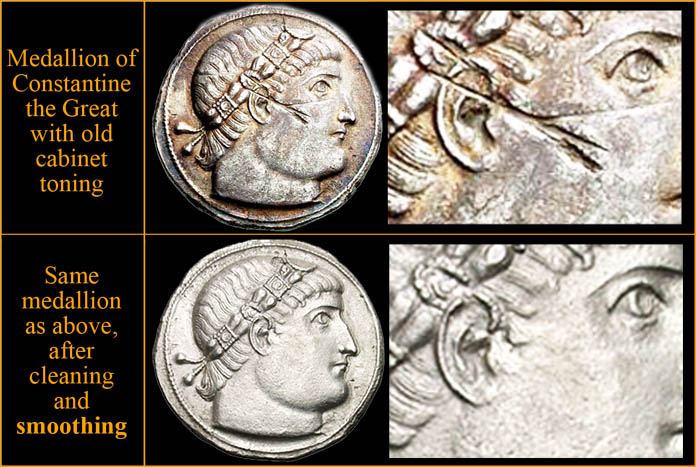
Fig. 10 shows at top a rare and beautiful medallion affected by severe, deep scratches (at top). The smoothing work consisted here in filling the scratches in order to smooth them and make them invisible or almost. This case is acceptable because the scratches were not on the original coin and they have been caused later by something accidental or someone with bad intentions. This job, which is very similar to what is done everyday by the professional restorers of national museums, has been well executed and the medallion successfully recovered its original appearance (at bottom). No other detail has been improved or enhanced. Interestingly, the numismatic company who sold this piece after its restoration wrote, in its description: ‘Several scratches on the cheek and ear and into the hair has been repaired’. This honesty and transparency must be acknowledged (the picture of the coin with its scratches was not pictured).
.
.
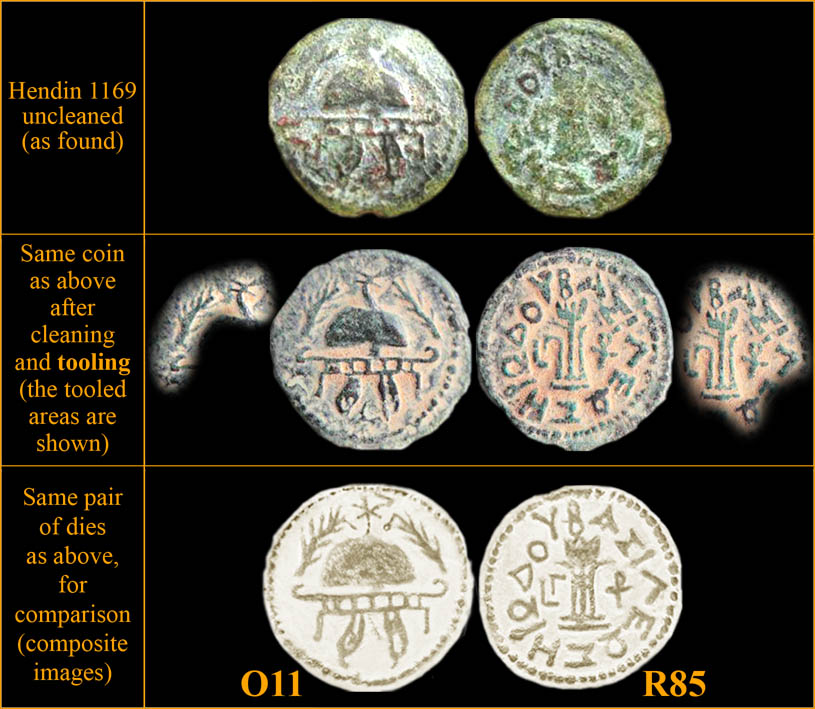
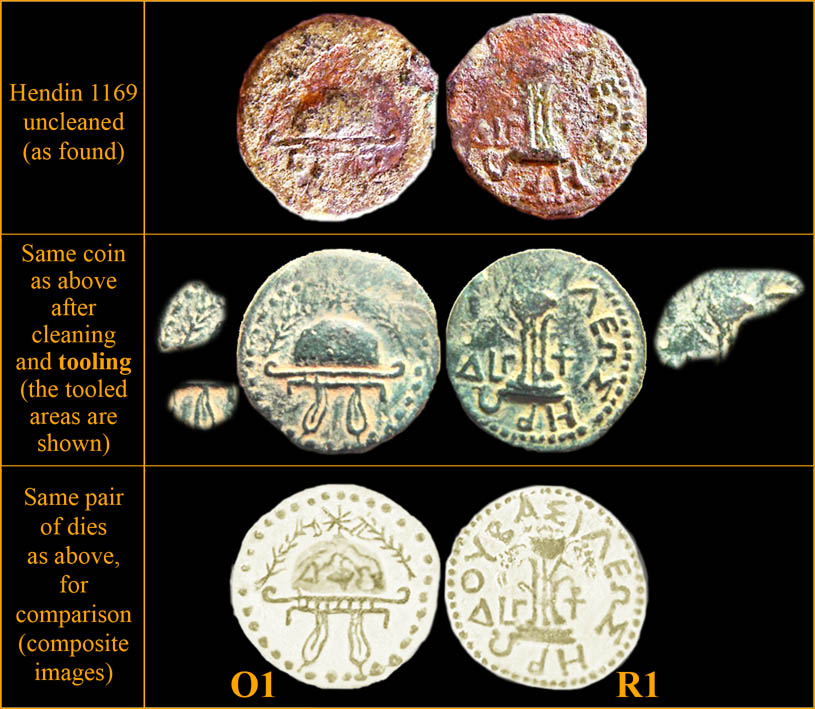
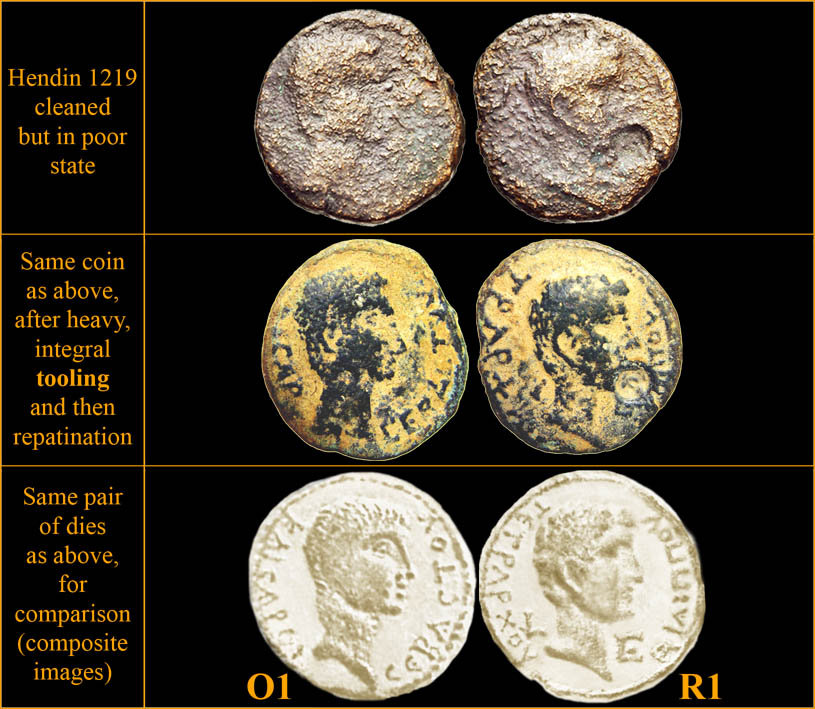
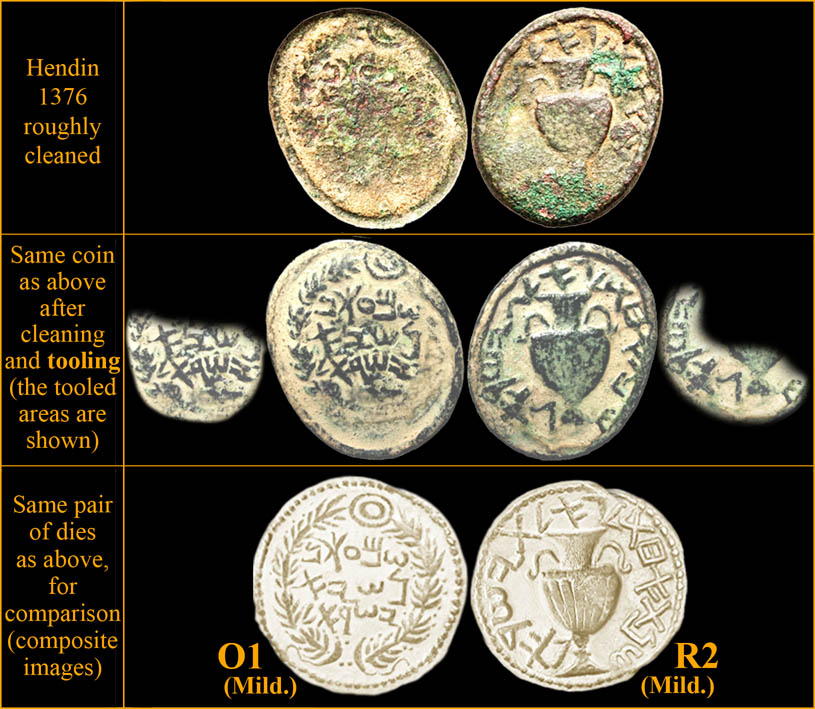
5. TOOLING BY ENGRAVING
.
Tooling by engraving is the practice of tooling or carving around the coin devices or legends of a worn coin to remove adjacent material, thus providing the appearance of greater bas-relief. In some instances, the engraving can recreate worn-away devices or legends, deceptively changing a "Poor" or "Good" coin to a higher grade. In other instances, coins may be enhanced by sharpening legends and adding back details of facial features, hair, crown, etc., thus changing a "Fine" coin to "Very Fine".
Note that, for obvious reasons, it is extremely rare to have pictures of the same coins before and after tooling. We are lucky to present 5 examples here (Figs. 11 to 15)
.
Fig. 11: Tooling: Before & after, example 1
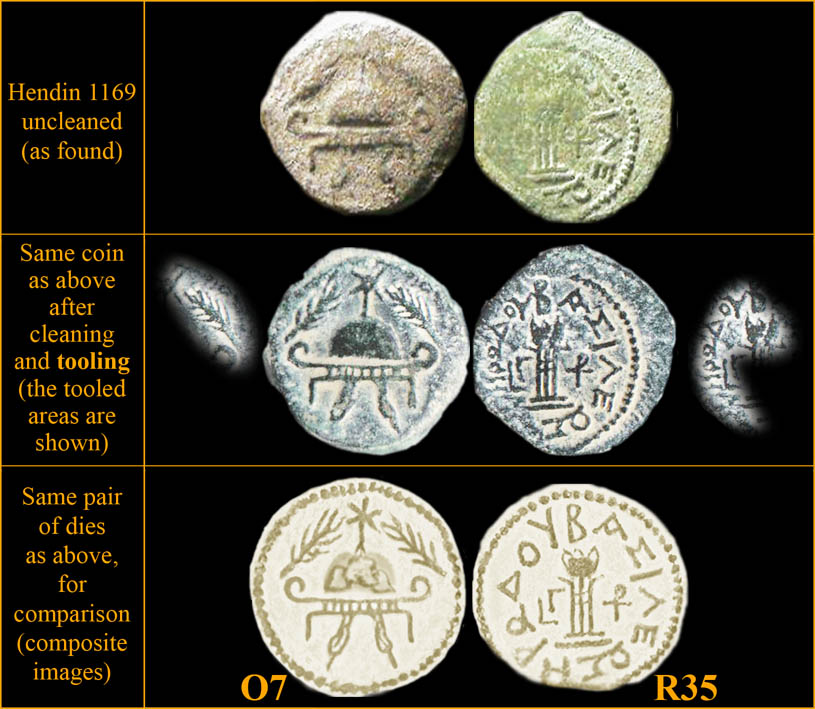
A coin tooled by someone stupid who had no idea of what the reverse dies of this coin type look like.
.
Fig. 12: Tooling: Before & after, example 2
This coin has been recently sold by a major numismatic company (Click here). The red repatination shown here has been replaced by a green/brown one.
.
Fig. 13: Tooling: Before & after, example 3
.
Fig. 14: Tooling: Before & after, example 4
Example of an important and extremely rare coin outrageously tooled. This specimen must be considered as irreparably destroyed.
.
Fig. 15: Tooling: Before & after, example 5
Another example of a coin irreparably destroyed by heavy tooling.
..
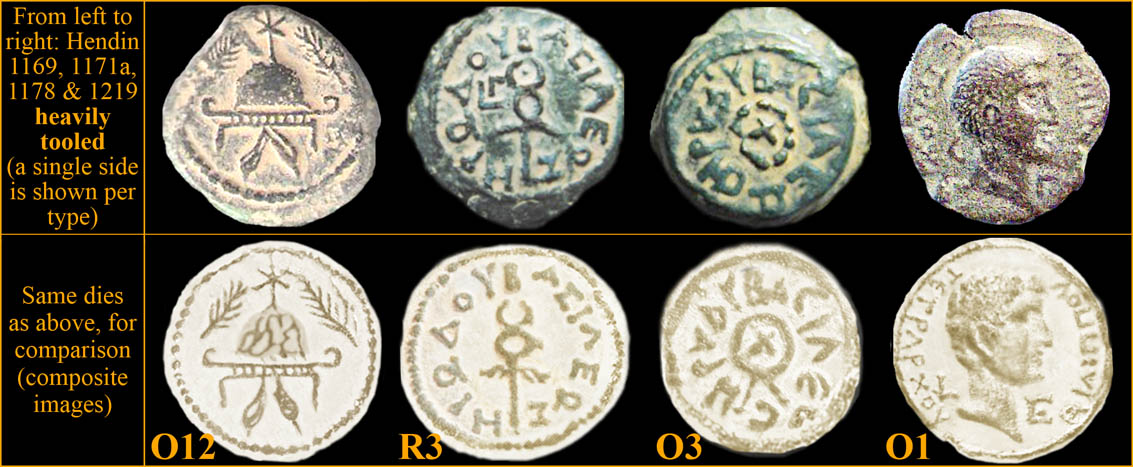
Fig. 16: Other examples of heavy tooling
.
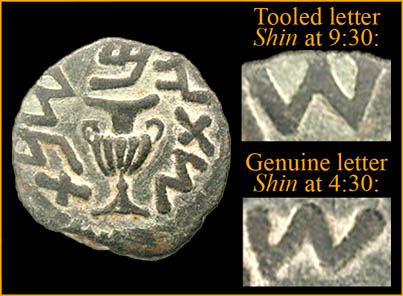
Fig. 17: Last example of tooling
.
.
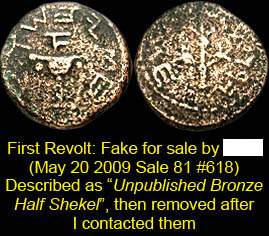
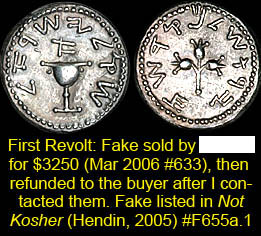
6. FAKES
..
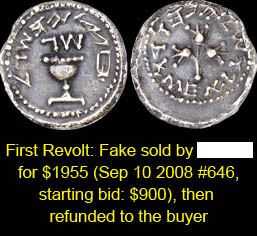
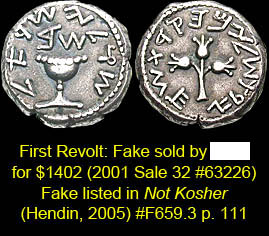
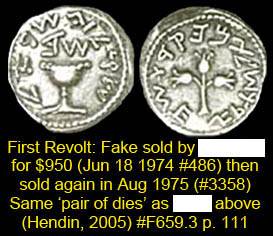
Three fake coins recently sold or offered for sale by famous numismatic companies are shown hereafter. I deliberately choose to only present coins of the Jewish War:
- Click on the pictures to see the coins in their original context -
.
.
.
Interestingly, I have also listed two specimens struck by the same pair of fake dies:
.
.
Jean-Philippe Fontanille
With the collaboration of Steve Fregger
....
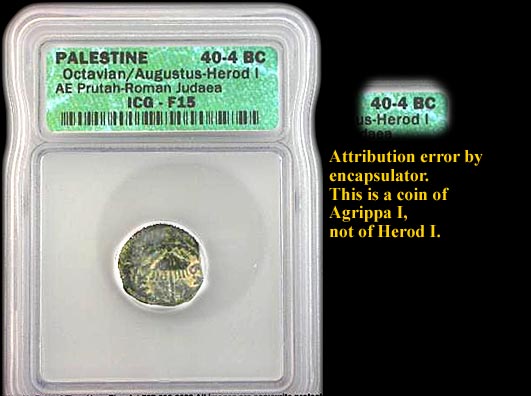
ATTRIBUTION ERROR BY AN AUTHENTICATING
& GRADING COMPANY:
..
Even the 'encapsulators' can make (big) mistakes!
.
....
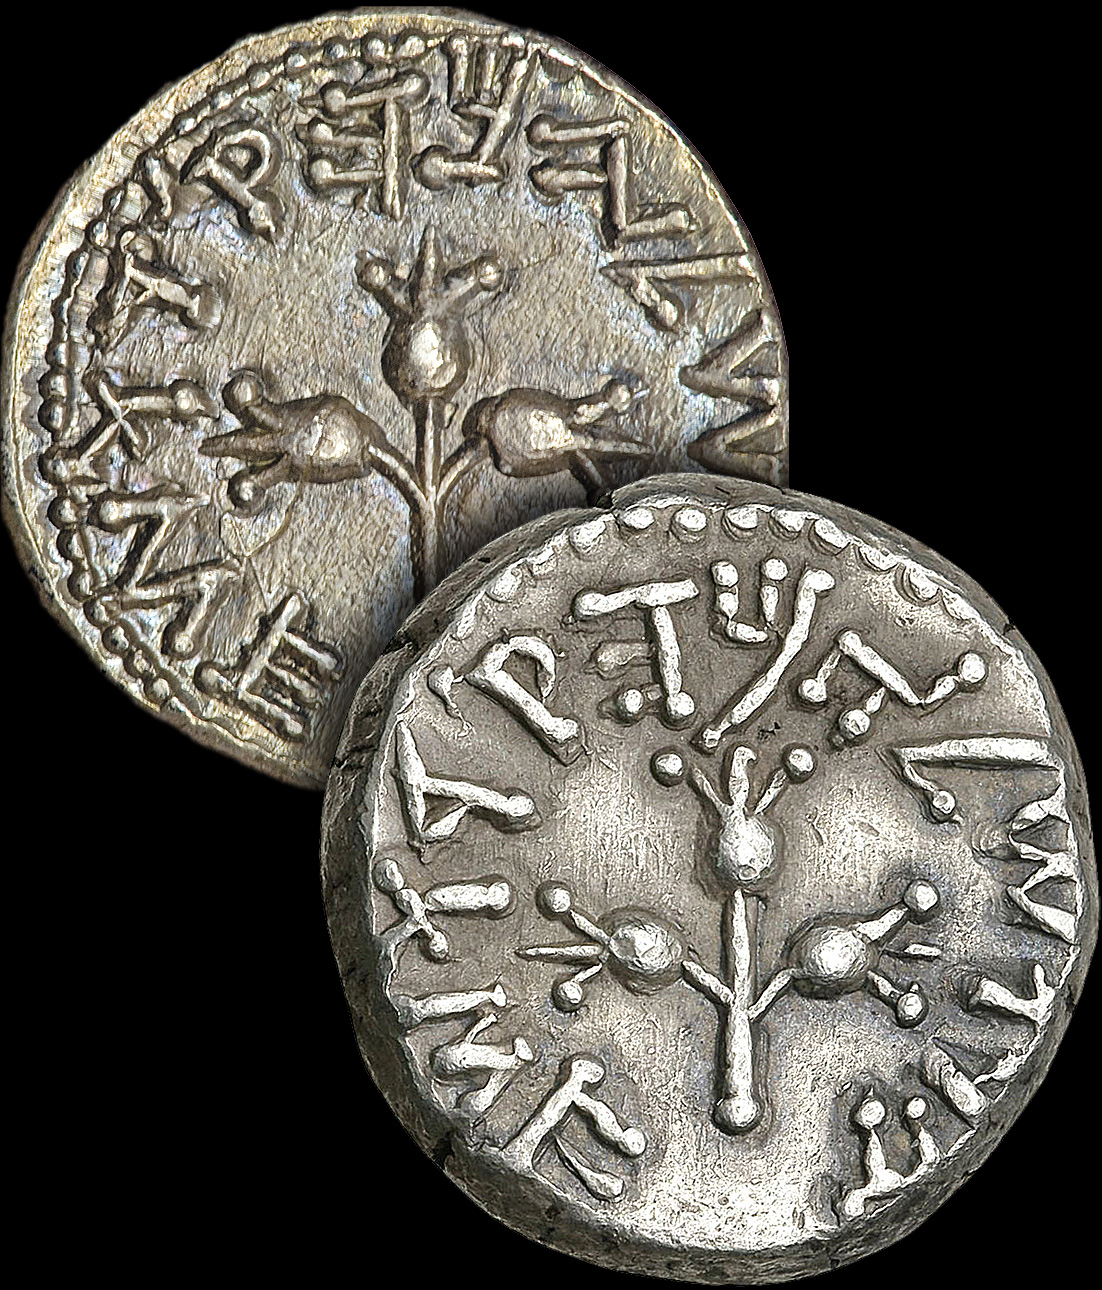
HIGH DEFINITION RIDDLE
..
About the extremely rare year 5 shekels of the Jewish War, Alan Walker (Leu Numismatics) wrote in 2003: "(...) Then there is the famous, and somewhat controversial, Baldwin/London group, which ostensibly derives from an otherwise unknown 19th century hoard: one piece has been in the British Museum since shortly after the coins first appeared, and the others reposed in the forgery trays (!) of the famous firm of Baldwin’s until they were rehabilitated in the early 1980s"
See the high definition pictures hereafter: The coin at top is the reverse of a genuine year 2 shekel as the coin at bottom is the reverse of a 'London Group' year 5 shekel. The question is still open: Are the coins of the London Group fakes? One thing is sure: in auctions, a London Group specimen can reach $50.000-60,000 as a regular year 5 shekel is two times more.
....